Professional vs DIY Window Tinting: Is It Worth It?
09 February 2026 · 10 min read · Solarblock

You watched a YouTube tutorial, bought a pre-cut kit, and spent Saturday afternoon in the driveway with a spray bottle and a squeegee. The front windows look decent. The rears have two small bubbles and a dust speck you can't unsee. The rear windscreen — with its compound curves and defroster lines — has a crease along the bottom edge that no amount of heat gun work will fix.
That's the typical first attempt. And it's not a failure of skill — it's a failure of environment.
Can You Tint Car Windows Yourself?
Technically, yes. Pre-cut kits are available online for most vehicle models, and the basic process — clean glass, spray solution, apply film, squeegee out water, trim edges — is not conceptually difficult.
But "not conceptually difficult" and "produces a good result" are different things. Window tinting is one of those jobs where the gap between an acceptable finish and a professional finish is obvious to everyone, and the variables that determine which one you get are mostly outside your control on a first attempt.
The film is extremely sensitive to dust particles, ambient temperature, humidity, lighting, and whether you can wrap a compound-curved rear window without folding the film.
What You Need for DIY Window Tinting
If you're going ahead, here's what's involved:
- Pre-cut tint film — matched to your vehicle model ($30–$80 for a full car kit in dyed or carbon film)
- Application solution — soapy water mix or commercial tint slip solution
- Squeegee — a proper tint squeegee, not a generic plastic scraper
- Heat gun — for shrinking film to curved glass (a hair dryer struggles with rear windows)
- Razor blade / precision knife — for final trimming
- Lint-free cloths — for cleaning glass
- A clean, dust-free workspace — this is the hard part
Total material cost for a DIY job: $50–$150 for film (pre-cut kits or enough roll film for a full car), plus $60–$80 in tools including a heat gun.
DIY Window Tinting: Pros and Cons
The case for DIY:
- Significantly cheaper on materials — $110–$230 all-in versus $330+ for professional carbon film or $495+ for ceramic
- You learn a skill
- You control the timeline — no booking, no waiting, no dropping the car off
The case against:
- Dust contamination is almost unavoidable in a home environment. A single particle trapped under the film is visible and permanent.
- Rear windows with compound curves and defroster lines are genuinely difficult. The film needs to be heat-shrunk to match the glass curvature, and getting this wrong creates fingers, creases, or lifting edges.
- No manufacturer warranty. Film warranties from brands like LLumar and XPEL require professional installation. DIY voids the coverage.
- If you make a mistake, the film is wasted. A second kit costs another $30–$80, and the time investment doubles.
- VLT compliance. You need to know the legal limits — 35% VLT on front side windows in NSW — and you need to account for factory glass tint when choosing your film shade. Get it wrong and you're either illegal or lighter than you wanted.
The realistic assessment: if you're patient, have a clean garage (not a driveway), and you're only doing flat side windows, you can get a serviceable result. Rear windows are a different skill level entirely.
Professional Window Tinting: What You Actually Get
Professional installation isn't just "someone else doing it." The process, environment, and materials are different.
Film quality. Professionals use commercial-grade ceramic, hybrid, and carbon film from brands like LLumar and XPEL — products that are only available through authorised dealer networks, not in retail kits. The heat rejection, UV blocking, clarity, and longevity of professional film is measurably superior to consumer-grade pre-cut kits. Ceramic film blocks 45–80% of infrared heat and 99% of UV. Carbon film doesn't block infrared — it's a quality product at a lower price point, but without the heat rejection of ceramic. A typical DIY dyed kit blocks 5–15% of heat.
Controlled environment. A professional workshop has filtered air, controlled temperature, and lighting specifically designed to reveal contamination and defects during installation. This is the single biggest difference between professional and DIY results. The skill gap matters, but the environment gap matters too. A clean workshop catches problems that a driveway hides — until you see them in direct sunlight on Monday morning.
Precision cutting. We use digital plotter systems that cut film to the exact shape of your vehicle's windows — kits cut to the exact shape, no knives on your car. No razor blades on the glass, no hand-trimming against rubber seals. The fit is precise, repeatable, and fast.

Heat shrinking. Rear windows with defroster lines and compound curves require the flat film to be pre-shrunk on the outside of the glass before application. This takes experience and a calibrated heat gun. It's the step that defeats most DIY attempts.
Warranty. Professional installation activates the manufacturer's lifetime warranty. That covers bubbling, peeling, cracking, discolouration, and delamination. DIY installation gets you no warranty at all.
NSW legal compliance. A professional installer uses film at known VLT ratings matched to your vehicle's factory glass, so the combined reading lands where it should. Photometric verification is available if you want a confirmed reading before you drive away. DIY has no verification step — you're trusting the film's stated VLT without accounting for factory glass.
Cost Comparison — DIY Kit vs Professional Installation
| DIY | Professional | |
|---|---|---|
| Film cost | $30–$80 (pre-cut dyed/carbon) | Included |
| Tools | $20–$50 | Included |
| Total cost | $50–$130 | From $330+ (carbon) to $495+ (ceramic) |
| Film type | Consumer dyed or carbon | Professional ceramic or carbon |
| Heat rejection | 5–15% (dyed) | 45–80% (ceramic) |
| Warranty | None | Lifetime manufacturer warranty |
| Time investment | 4–8+ hours (first-timer) | Half a day (drop off, pick up) |
| Risk of redo | High (rear windows especially) | Negligible |
The price gap is real: $50–$130 versus $330+ for carbon or $495+ for ceramic. But the comparison isn't apples to apples. The film is different, the finish is different, the warranty is different, and the time investment is different.
Factor in the value of 4–8 hours of your time. Factor in the probability of needing a second attempt on at least one window. Factor in the fact that a botched rear window often means paying someone to strip and redo it anyway — at which point you've spent more than professional installation would have cost from the start.
Want it done right the first time?
Professional ceramic tint, controlled environment, full warranty. Hornsby & Gosford.
Get a Free Window Tinting QuoteOr call: 0422 976 875
How Long Does Window Tinting Take?
Professional installation: half a day. Drop the vehicle off in the morning, pick it up after lunch. A full car tint — all side windows, rear windscreen, and any extras like a windscreen visor strip — takes a few hours of installation time, plus prep and final inspection.
DIY installation: 4–8+ hours for a first-timer doing a full car. Side windows go faster — maybe 30–45 minutes each once you get the hang of it. The rear windscreen can take 1–2 hours on its own if the curves give you trouble. Add time for cleaning, re-doing any windows that didn't work the first time, and final cleanup.
After installation, the film needs about 48 hours to fully cure. During this time, don't roll the windows down. Small water bubbles may be visible — these are normal and disappear as the adhesive cures. This applies to both professional and DIY installations.
Common DIY Tinting Mistakes
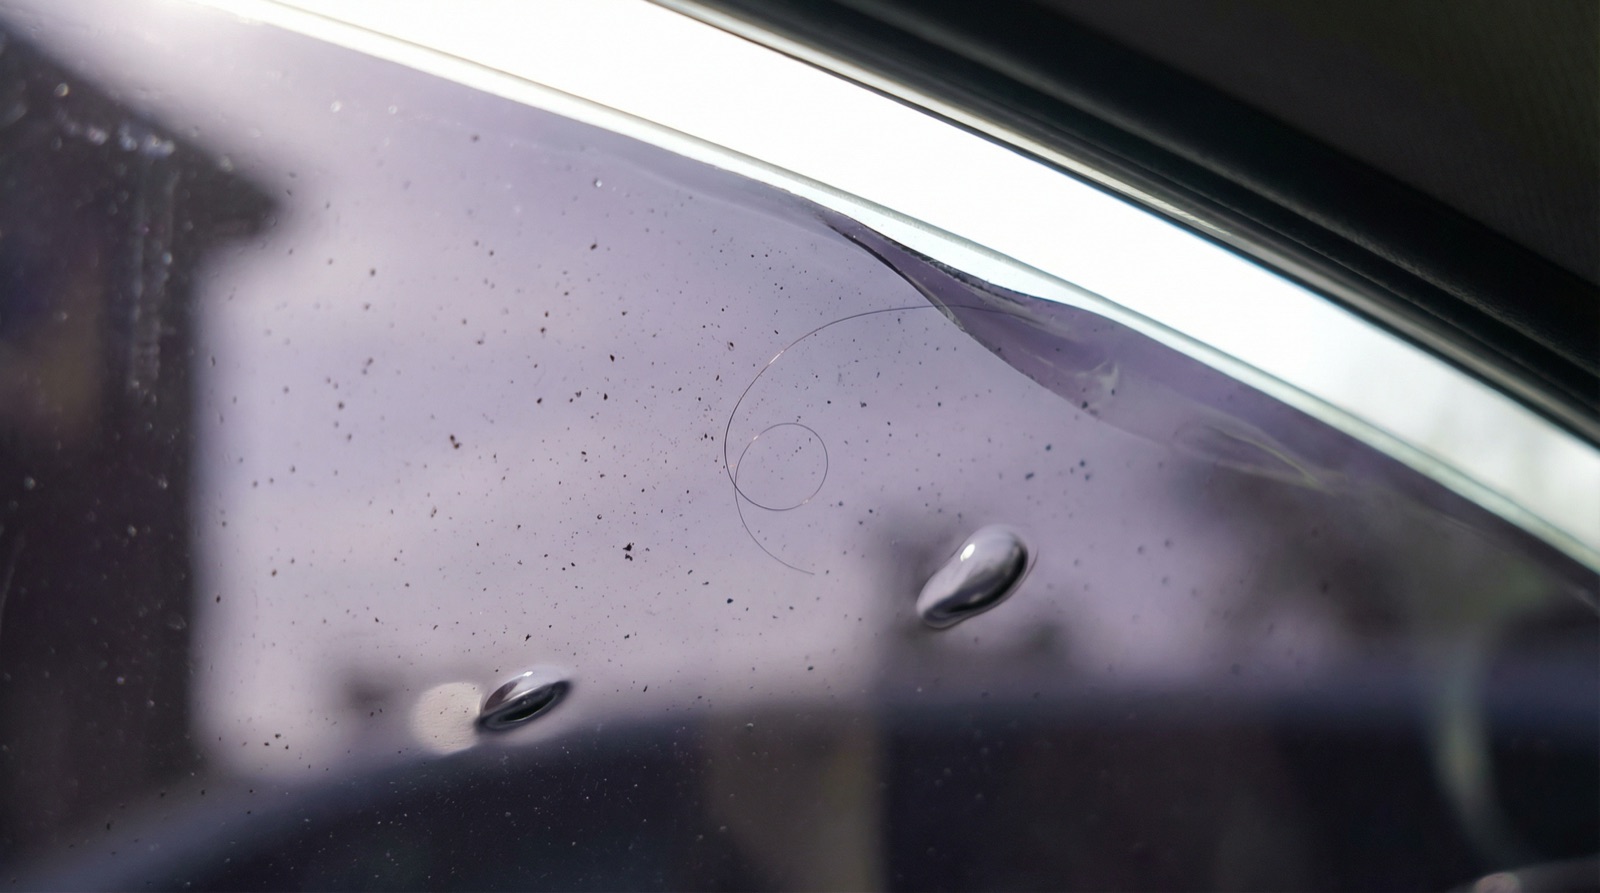
Dust contamination. The number one cause of DIY tint failure. A single hair, dust particle, or fibre trapped between the film and glass is visible and permanent. Professional workshops control this with filtered air. A garage or driveway doesn't. Even a "clean" space has airborne particles that settle onto wet adhesive in seconds.
Bubbles. Caused by insufficient squeegee pressure, uneven solution distribution, or rushing the application. Small bubbles during application are normal — they should squeeze out. Large bubbles or clusters that remain after the initial application usually mean the film needs to be peeled back and reapplied, at greater risk of contamination.
Creased film. Once the adhesive side folds onto itself or creases during handling, the film is ruined at that spot. There's no fixing a crease. On rear windows where you're wrestling a large piece of film around a curved surface, creasing is the most common frustration.
Wrong VLT. Choosing film based on the rated VLT without accounting for factory glass tint. Factory front windows typically transmit 70–75% of light. A "35% film" on 73% factory glass produces about 26% combined VLT — below the NSW legal minimum. Professional installers calculate for this. DIYers often don't.
Defroster line damage. Rear windscreens have printed defroster lines. Aggressive squeegee work or razor trimming can scratch or damage these lines. The damage is permanent — and a rear windscreen replacement is $300–$1,500 depending on the vehicle.
The Verdict
DIY window tinting is doable. But for a finish that looks professional, lasts a decade, and actually performs on heat rejection and UV protection — professional installation is the right call. The cost difference is $200–$400+. The quality difference is visible every time you look at the glass.
While we primarily work with new cars, we have seen seen plenty of cars after a DIY attempt — a Camry owner came to us after his six-month-old DIY job started failing. The side windows were passable, but the rear windscreen had a visible crease along the bottom and trapped dust particles you could see from the back seat. He'd already spent money on the kit and hours of his time, and still ended up paying for professional ceramic tint.
Whether the original film was DIY or a cheap professional job, the result is the same: you end up paying twice to get it right.
We fit professional ceramic window tint at our Hornsby and Gosford workshops. If you've been weighing up DIY versus professional, bring your new car in for a quote — we'll show you what quality film and a controlled installation looks like, and you can make the call with all the information.
For a full guide on ceramic tint specifically — how it works, what it costs, and how it compares to standard film — read our ceramic window tint guide.


